When documents grow longer and longer, it can be become increasingly difficult to see the overall structure of your thesis. There are three essential techniques, which you can use in different combinations, to keep the big picture in mind:
Document Map provides an interactive table of contents that remains visible as you work with your document. To move quickly from topic to topic in the document, you simply select headings listed in the document map.... more details
New Windows provide separate views into your document, so that you can see and compare the content of separate sections at the same time, making comparisons and cross referencing between chapters quite easy..... more details
Outline View allows you to work at a range of heading levels, for instance if you are trying to re-organise the sequence of topics in a chapter you can collapse the view so that it displays only topic headings. You can then quite easily move entire topics around each other. You can also rearrange the structure of your document, for instance to demote a topic to a sub-topic, so that your text is more logically organised..... more details
Long Documents Managment in MS Word
The Document Map and Outline View require that you make use of Heading Styles, as these identify and locate headings and sub-headings in your document. Heading Styles can be created, modified and applied by using Styles (tools for structured formatting) or by promoting and demoting text in the Outline View. Heading Styles are also essential for the automation of your table of contents.
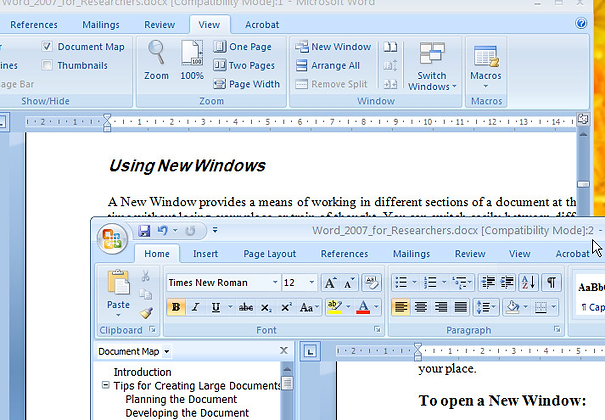
Using New Windows
A New Window provides a means of working in different sections of a document at the same time without losing your place. You can switch easily between different sections or chapters of your document, for instance to create cross-references between those sections and thus improve the connections and consistency between different parts of your thesis.
Another use of New Window is to keep key sections of your document, such as the Reference List, open at all times so that you can record citations on the fly as you work, without losing your place.
To open a New Window:
A two-window view (filename:1 and filename:2) of this document
-
Note: Each New Window is simply a separate view of a document and is not a separate file.
As you close New Windows you are not prompted to save the document until you close the original window, ie the window with sequential number : 1.
Each new window is numbered sequentially so you can keep track of where you are working.
-
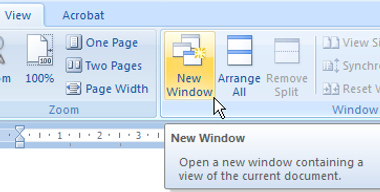
•From the View menu, in the Window panel, select New Window.
-
A new instance of the document opens at your current place. Use Document Map to browse to another topic or chapter within the document. You now have two Windows into your document, ie views of two separate topics.
Switch back and forth between the two Windows by selecting them from the Windows Task Bar:

-
An even easier way of switching between Windows is to use the Alt+Tab fast switching method: hold down Alt, then tap the Tab key – a list of open applications and documents appears – tap Tab again to select the window you want to view next.
You can have as many windows open on a document as you need, to work simultaneously on any number of different chapters or topics. Each new window is numbered sequentially in the document title bar so that you can keep track of which window you are currently viewing:
Using Document Map
The Document Map displays a list of the headings in the document. The advantage of using Document Map is that it enables you to click the headings to navigate quickly around a document.
The Document Map and Outline View require that you make use of Heading Styles, as these identify and locate headings and sub-headings in your document. Heading Styles can be created, modified and applied by using Styles (tools for structured formatting) or by promoting and demoting text in the Outline View. Heading Styles are also essential for the automation of your table of contents.
To Turn Document Map on
-
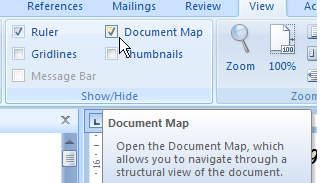
From the View menu, in the Show/Hide panel, select Document Map.
When Document Map is turned on, a list of headings is displayed in a separate pane on the left of the screen. This provides a quick overview of the document outline. You can move quickly to different parts of the document by clicking on headings in the Document Map.
If you don’t see any headings in your Document Map, it is because you have not applied a Heading Style to any part of your text. Heading Styles are also essential for basic tasks such as inserting a table of contents. See Using Styles on page 34.
The and symbols next to the headings in the Document Map show that there are subsections within sections. Clicking on a or w ill expand or collapse headings to show or hide sub-sections. Right-clicking on a or gives further options for expanding or collapsing the sections to a particular heading level.
To Turn Document Map off
-
From the View menu, in the Show/Hide panel, de-select Document Map.
Using Outline View
• From the View menu, in the Document View panel, select Outline.

The document display changes and the Outlining menu is opened:
The Outlining Menu

With the outlining view turned on, hover your mouse over each item on the menu to see a brief explanation of what each item does. These are covered in more detail below.
Creating a Document in Outline View
Any new document can be created whilst in outline view. If the document is going to be long, such as a chapter of a thesis or book, then using outline view can save you time and help maintain a consistent structure.
To create a new document in outline view:
-
Open a new blank document.
-
From the View Menu, select Outline.
You are now ready to begin entering the headings of your document.
-
Type the first heading, which is automatically formatted using the Heading 1 Style.
-
Press the [Enter] key to start the next paragraph at the same heading level. Type another heading.
-
Use the Demote button to convert the heading to a subheading:

-
Continue typing the headings and subheadings of your document using the promote and demote buttons.
-
When you are ready to begin adding text to your sections, use the double-arrow to Demote to Body Text.
-
You now have some headings and subheadings (which will display in the Document Map and Table of Contents) and some ordinary text (which will not):
The and symbols indicate whether or not a heading contains subheadings or text. A indicates that a section contains additional detail, while a shows that a section has not been started yet (apart from being given a heading).
You can select an entire topic, including its subsections, text, graphics and anything else it contains, by clicking on the or symbol.
Usefully, as you build your document outline you can keep track of which topics have not been started yet by noticing the symbols. Note however that a heading may contain nothing but sub-headings!
Promoting and Demoting Heading Levels
An advantage of using Outline View is that the Heading Levels can be changed easily. Any heading level can be promoted to a higher level or demoted to a lower level (for instance to change the structure of your topics, to control which topics “belong to” other subjects.
To Promote a Heading level:
-
Click anywhere in the heading text that is to be promoted.
-
On the Outline menu click the Promote button. (The one with the arrow pointing to the left).
This promotes the heading text to the next higher Heading Style. The heading text can be promoted to level one (eg a chapter heading) by clicking on the Promote to Level 1 button, which is the button with two arrows pointing to the left.
To Demote a Heading Level:

An example of a Document created in Outline View
-
Click anywhere in the heading text that is to be demoted.
-
On the Outline Toolbar click the Demote button. (The one with the arrow pointing to the right).
This demotes the heading text to next lower Heading Style. The heading text can be demoted to body text by clicking on the Demote to Body Text button, which is the button with two arrows pointing to the right.
Collapsing and Expanding Headings
-
Outline View enables you to expand and collapse headings to show or hide the headings, text and other contents of particular topics. To work on your text while keeping your outline visible you can have all of the headings collapsed except for the topic you are working on.
To Expand Headings:
-
Click in the heading that you want to expand.
-
Click on the Expand button on the Toolbar, which is the one with the plus sign.
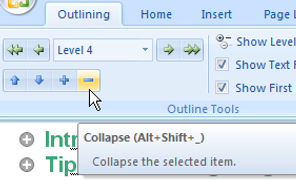
To Collapse Headings:
-
Click in the heading that you want to collapse.
-
Click on the Collapse button on the Toolbar, which is the one with the minus sign.
You can expand or collapse sections to progressively reveal or hide subsections and text by repeatedly clicking the Expand or Collapse buttons. To expand or collapse a topic to its full extent in one hit, ie own to Body Text or up to the Heading itself, click the symbol for that heading before using the Expand and Collapse buttons.
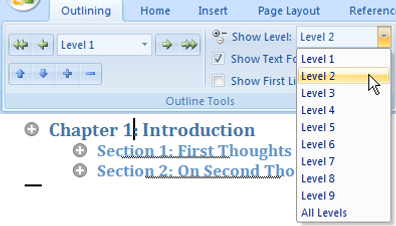
You can also expand or collapse your entire document to show or hide the outline structure at any given level (eg just chapter headings, or Chapters + first level subheadings) by using the Show Level dropdown list:
Changing the Sequence of a Document
-
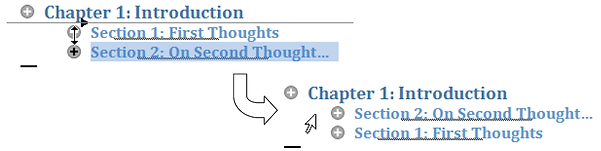
Another benefit of working in Outline View is that you can easily rearrange the sequence of your headings and text by moving the headings and subheadings to different locations in the document. When you move a heading all subheadings and body text associated with it will be moved as well.
To Change the Sequence of a Document:
-
Identify the heading level of the topic you want to move.
-
Use the Show Level button to display the entire document at that outline level.
-
Click and drag the symbol for the topic, using the arrowed insert line to move the entire topic to its new position.
Following these steps will ensure that you do not leave behind portions of a topic or accidentally mix levels between topics. For small moves only, click the symbol and use the Move Up and Move Down Arrows on the Outline menu.
Master Documents
A large document, such as a thesis or book, is usually made up of a number of smaller documents, such as chapters. The Word 2007 Master Document feature can be used to combine a number of smaller documents into one, while maintaining each as a separate file.
A master document is simply a new document into which the multiple smaller documents, known as subdocuments, are added. Working with a master document enables you to:
-
Manage and share your chapters (eg with supervisors) as separate files
-
Generate a complete table of contents and index.
-
Display and Print the multiple subdocuments as one.
To create and manage the master document, a special view called Master Document View is used. It includes an extended outlining menu allowing you to further manage the contents of the master document.
When each subdocument is inserted into the master document, the following occurs:
-
Section breaks are automatically inserted above and below the subdocuments.
-
All Styles are maintained. If the master document has Styles with the same name as the subdocuments, then Word provides an option to rename the Styles in the subdocuments or to apply the Styles from the master documents in the subdocuments.
Keep in mind that your Styles should be consistent.
-
All margins, page settings, headers and footers within subdocuments will be retained as they are.
You need to be in Outline View to create or use a master document. Once you’re in Outline View, you can easily add and delete subdocuments to and from the master document and move the subdocuments to change their order. You can also open, modify, and print any subdocument from within its master document. All of the subdocuments can be expanded and displayed in Print Layout View, enabling you to see the document as it will print.
Note: a subdocument is not actually saved inside of its master document. Instead, a master document contains information on where to find the subdocument file. When you open a master document, all of its subdocuments are closed, or collapsed, by default. You can open a subdocument as a separate file by ctrl+clicking its text if the subdocuments are collapsed, or by double-clicking its subdocument icon when the subdocuments are expanded. You can open all the subdocuments at once by using Print Preview on the master document.
Creating a Master Document
The following steps are required to create a master document.
-
Create a new document via the Office Button.
-
Add any formatting and text that you require to be part of the master document (eg a title page, acknowledgements).
-
Turn Outline View on (see Using Outline View below ).
-
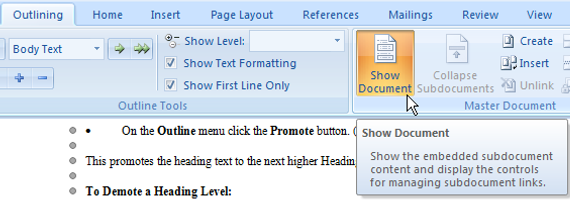
Turn Master Document View on by clicking on the Show Document button on the Master Document panel of the Outline menu. The Master Document panel expands to show more options.

Save the master document as you would any file: click the Office button and Save As to save the file under a particular folder and filename (name it something like Master.docx to save confusion later)

Creating or adding a subdocument
You can create subdocuments from scratch within the master document, or add them from files you have already created.
To create a new file as a subdocument:
-
• In the master document, on the expanded Master Document panel click the Create button. A new section is inserted into the master document.
-
• The new section is displayed in Outline View. Add headings, subheadings and text as per the notes on Outline View.
-
• With the cursor still in this section, click Save via the Office button or the Save shortcut: A new file will be created in the same folder as the master document, with a filename corresponding to the top level heading of that section.
-
• At any time, the subdocument can be opened by double-clicking its subdocument icon . The file opens in Print Layout View, with all the headings and text that have been created via the master document. The subdocument can now be saved as a particular filename and location that you specify via the Save As command.
-
To insert an existing file as a subdocument:
-
• In the master document, on the expanded Master Document panel click the Insert button. An Insert Document dialogue opens. Browse for your existing file and click Open.
-
• If there are any inconsistencies in the Styles available in your master and subdocument files, you will be prompted to choose which Style to retain.
-
• Repeat this process to insert as many subdocuments as you require.
-
• Save the master document in the usual way.
Opening a Subdocument from within a Master Document
-
• Open the Master document.
-
Switch to Outline view and activate Master Document view.
-
Double click on the icon beside the link to the subdocument.
Removing a Subdocument from the Master Document
-
Open the Master document.
-
Switch to Outline view and activate Master Document view.
-
Click on the subdocument icon to select it.
-
Press the delete key.
Note: this does not delete the subdocument file. The original file still exists. All it does is remove the subdocument from the master.
Unlinking a Subdocument from the Master Document
You can place the contents of a subdocument directly into the master document, for example to incorporate your acknowledgements file into the start of your master document.
-
• Open the master document.
-
• Switch to Outline View and activate Master Document View.
-
• Click on the subdocument icon to select it.
-
• Click on the Unlink button.
Note: again, this does not delete the subdocument file. The original file still exists. All it does is import its content into the master document and remove the link to the subdocument.
Merging, Splitting and Locking Subdocuments
These relatively advanced options should be used with caution, if at all. See Word Help (Press F1) for more information on these options.
References
ODU & TLC (2008) USING MICROSOFT WORD 2007 TO CREATE A THESIS. University of New England. Retrieved on 15/11/2015 from www.une.edu.au/od.
